Azure load balancers act as a highly available single point of contact that evenly distributes traffic to hosts in a backend pool, they can be utilised with health probes to ensure layer 4 traffic (TCP/UDP) is consistently and evenly distributed to healthy VM's.
This article shows you how to build an Azure load balancer then configure Network Address Translation (NAT) and Port Address Translation (PAT) rules for SSH traffic through for support or monitoring purposes, then lock it down through a network security group. This can easily be adapted for many other types of traffic.
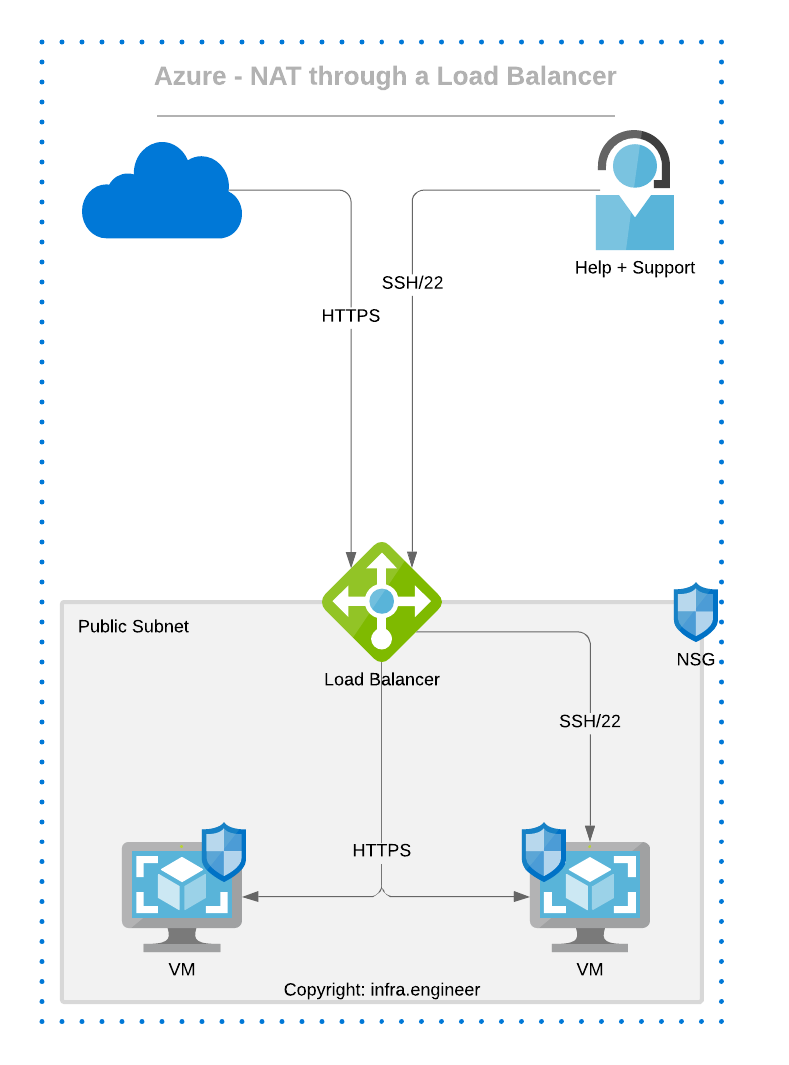
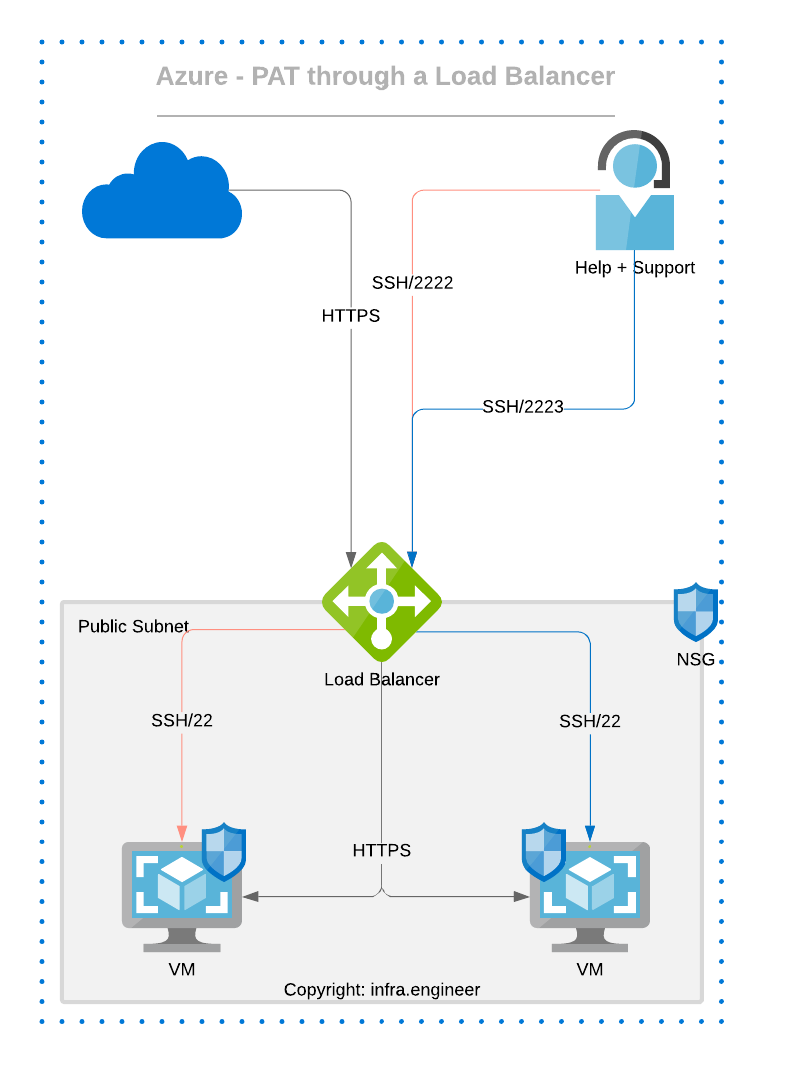
To visualise how NAT or PAT flows, please see the following diagrams,


Within the Azure portal, navigate or search for Load Balancers then select Create Load Balancer
Create the Load Balancer as per your requirements in the region that your servers are in, selecting Standard SKU and for greatest resiliency select Zone Redundant
Add any tags then create the load balancer
Once the load balancer has been created, go to the Overview tab to get your public IP address that you will eventually point any DNS records to.
Create 2 VM's as per your requirements ensuring they are in the same resource group as your load balancer, when you are setting the NIC network security group (NSG) create an NSG with a logical name that you can use for both VM's, within the advanced section of the VM creation wizard ensure you set the VM load balancing settings similar to the following;
Once the VM's are created go to the Load Balancer then create a backend pool and add your 2 new VM's
Add any health probe and load balancer rules as per your requirements.
Create an inbound NAT rule
Under the load balancer, select Inbound NAT Rules and create a rule based on your requirements, the example below shows a NAT rule for SSH which will forward any traffic on port 22 to the NIC on WEB1.
Once the rule has created and your NSG permits 22, try SSH to the public IP and you should be at your login screen if using Linux where you can verify you are on the correct server as per your NAT rule.
The issue with this NAT rule is that you would have to employ a different method to access other VM's in the backend pool and you do not really want to be using standard ports for management so it would be better to utilise PAT rules for this purpose.
Create an inbound PAT rule
From a security perspective rather than using a well known port for your inbound rule it would be better practice to use a non-standard port (In an ideal world you would use a bastion host but for various reason this may not always be feasible). For example with port address translation you could use TCP port 2222 inbound on the load balancer to convert this to port 22 on a nominated VM, to achieve this, change your port to your chosen port, move the port mapping slider from default to custom then set the target port to your requirements in the case of SSH set it 22.
When you connect to it ensure your port is set correctly and not the default, i.e.
Once the first PAT rule is configured a second one can be added utilising a different port then translated to the other backend pool VM for example port 2223 through to 22 on the other VM.
Lock down the NAT/PAT rules
If you are using the inbound NAT/PAT rules for management access you should lock down the source ports from which these can accessed in the same way you would configure an ACL on a firewall. As you can not set an NSG on a load balancer it has to be achieved at either the VM or subnet level, even with a PAT in place you still set the NSG with the translated port with all other traffic hitting the implicit deny rule.